Garden Party
Summer Celebration: Fourth of July Special
Special | 28m 44sVideo has Closed Captions
Join Trace Barnett, host of APT's YouTube series Garden Party, for a 4th of July celebration!
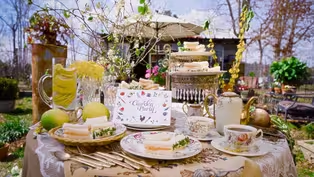
You're cordially invited to a swanky, southern summer celebration! Trace Barnett, host of APT's YouTube series Garden Party, will be joined by Birmingham's award-winning caterer, Kathy G of Kathy G & Co. for recipes and party tips that will light up your Fourth of July!
Problems playing video? | Closed Captioning Feedback
Problems playing video? | Closed Captioning Feedback
Garden Party is a local public television program presented by APT
Garden Party
Summer Celebration: Fourth of July Special
Special | 28m 44sVideo has Closed Captions
You're cordially invited to a swanky, southern summer celebration! Trace Barnett, host of APT's YouTube series Garden Party, will be joined by Birmingham's award-winning caterer, Kathy G of Kathy G & Co. for recipes and party tips that will light up your Fourth of July!
Problems playing video? | Closed Captioning Feedback
How to Watch Garden Party
Garden Party is available to stream on pbs.org and the free PBS App, available on iPhone, Apple TV, Android TV, Android smartphones, Amazon Fire TV, Amazon Fire Tablet, Roku, Samsung Smart TV, and Vizio.
Providing Support for PBS.org
Learn Moreabout PBS online sponsorship- Hey, I'm Trace Barnett and welcome to "Garden Party."
Today I'm gonna show you how to make a spectacular 4th of July party that your guests are gonna ooh and ah over, and you're gonna be the host of every 4th of July party from here on out.
(bright music) Today, it's my favorite holiday, the 4th of July, and I'm here with one of my favorite people on Earth, entertainer extraordinaire, the grande dame of Birmingham food and catering, Kathy G. You are like Birmingham's premier entertainer, so.
- Let's say the longest (laughs) entertainer, but it's so fun.
I have a passion for it.
I totally enjoy it.
I think it's so much more than just food.
- It's more than food, yeah.
- It's how your table looks.
It's the atmosphere, the experience a person has the minute they walk into a party.
The music, the smells, the look.
- The table.
(xylophone chiming) The perfect guest at any party, especially a 4th of July party, is Kathy G. She's the perfect entertainer.
She's been a great inspiration to me in entertaining through the years.
We are gonna set this table up into the dream 4th of July buffet you've ever seen.
But first things first, I wanna work on a few little craft projects.
It's gonna save us a little money and it's gonna also make things custom for our party.
- That's great.
- So we have a little dollar store glass here.
- It's very simple.
- I mean, pennies on the dollar.
And this is just a little bit of duct tape.
And I usually do three lines, and you can alternate these red, white, and blue if you want.
So start off by just putting that there on the back, and I'm gonna pull this tape just as tight as I can and I'm gonna roll the glass.
- There we go.
- You'll get the hang of it, Kathy.
- I see.
- You're doing good.
Just take that and roll it around that glass.
- Roll it and we're gonna have to... - Just like that.
- We snip it?
- And just snip it just like that.
And boom, you have easy-breezy glasses that are custom for your table.
My favorite 4th of July memories as a kid would definitely be all of my family gathering, all my cousins together.
Cornhole games, croquet outside, homemade ice cream, tables laden with any kind of grilled food or side dishes that you can imagine.
And, of course, I love the fireworks.
I think everything is just so much more magical as a kid.
All right, I got another time saving and money tip for us too.
All it requires are these terracotta pots here and a little bit of pea gravel.
I'm gonna get a little pea gravel here.
- We're gonna fill it up.
- Yeah, thank you.
And I'm gonna fill this pot up with pea gravel.
And you want it to be just under the rim there of the pot.
And just pop those candles directly onto that.
You can either use flat candles like that or you can use taper candles, either one.
What's great about these is you already have terracotta pots laying around anyway, and if you're outside, your candles can just melt down into the gravel and you can just pop those directly out when your party's over.
All right, Kathy, we've got our table partially set up.
We've gotta get in that kitchen.
- We've gotta start cooking.
- We got lots to cook.
- It's gonna be so fabulous.
And the centerpiece of it is tomato pie.
- Come on, let's go get busy in the kitchen.
- Let's go.
- Tomato pie is one of those iconic Southern dishes that I really have no idea the history of.
Like, where did a tomato pie come from?
But, you know, I guess it was, I mean, a genius who decided to fill a pie crust with tomatoes, with mayonnaise, a little bit of dash of hot sauce if you like it a little hot, and cheese.
Summer's here and it's officially tomato pie season.
- It is tomato time for sure.
- And Kathy G thinks she makes a better tomato pie than me, and I'm just not so sure about that.
So let's have a tomato pie.
- [Both] Showdown!
- Any good tomato pie starts with the perfect crust.
- Absolutely.
- And I believe a homemade crust is always a little bit better because you kind of have that really good controlled flakiness.
So to get started, we are gonna need 2 1/2 cups of all-purpose flour.
Throw in, if you don't mind, just a teaspoon of salt.
And that's all the dry ingredients that this calls for.
So I have six tablespoons of butter here that I've been keeping in the refrigerator just until we're ready to throw this in.
I prefer to take my butter and I cut it just into small squares.
- [Kathy] I do too.
- And I'm just gonna throw that into our dry mixture there, just kind of alternating it.
And if you'll start cutting in that, I'm gonna throw in our lard.
I have half a cup of water that I have thrown in some ice cubes to just to get that water as cold as possible.
Just slowly add it a tiny bit at a time.
And you want to get your dough to where it just resembles coarse crumbs.
And you want to add water to it just until the dough comes together.
I'm going in.
- I want you to- - You know, the best tools in the kitchen are the hands.
- I think you need your hands.
- Always.
This is going to make two pie crusts.
So if you're making a double pie, that's gonna make a double pie crust.
- My recipe is also for two pie crusts.
- Oh, her recipe's for two pie crusts too.
So you want to form your dough just into a ball simply by folding it over because you don't want to overwork your dough because then it's gonna be tough, and nobody wants a tough crust.
I'm gonna give this one to you.
And what you're gonna do is take it and smoosh it- - And just form a little ball.
- Form it into a little disc.
Or do you form yours into a ball?
- I kind of do it, well, a flat, flat ball.
- A flat ball.
Would you call a flat ball a disc?
I guess so.
(Kathy laughs) Let's wrap our dough in parchment paper here.
If you were gonna use this same day, let this at least chill 30 minutes to two hours.
- Definitely.
- And the longer that you let this chill, I'm sure you know from experience, the better it is to roll out.
So let's head to the fridge and pop these in.
- Okay.
- So we've just pulled our chilled pie dough out of the refrigerator and you don't wanna waste any time here.
Get ready and start rolling.
- Right.
Both recipes.
- And you want to do an ample amount of flour on both sides.
So I just take it and I just double over almost like I'm making a biscuit dough.
- Just a little bit more.
- Oh, you need a little bit more?
I'm not trying to sabotage your pie crust or anything.
She gonna hit me in the head with a rolling pan for it though.
- That's why we have these.
Okay.
- Instead of just going rogue with it, you kind of evenly roll it out.
Now, you want this to be rather thin, so anywhere from 1/4 of an inch to a half inch, and you want just under an inch of overhang when you put this into your pie dish.
Show me what you're doing here.
- So just take your roller.
And you can do this and roll your dough.
- Look at that, how beautiful.
- See?
Look at this.
And you don't have to pick it up and struggle with it.
And let's just put it right over here and unroll it.
- Just look at that magic.
Once we get it into the pie, I like to take mine and just fold over that excess crust.
And if you have edges that aren't so pretty, what we're gonna do is we're gonna crimp them.
And all you do is you just take your fingers like this.
- Just pinch it.
- And you just press that one finger directly in there.
So you want to go ahead and pre-bake your crust for a tomato pie.
If you threw your tomato pie directly into this, what's it gonna be, Kathy?
- Soggy.
- Soup.
And nobody wants a soupy, soggy pie.
I mean, that's blasphemy in the South, I think.
- Absolutely.
- So all you need is a little bit of parchment paper and, you know, loosely mold that into your pie there.
And just some dried beans.
And I'm gonna pour that directly into that.
And if you would just smooth that out a little bit for me.
- Let's just smooth that out to get it, to weight it.
- And that weight is gonna keep our pie from puffing up and going a little bit wonky when it's in the oven.
So we're gonna throw this in a 375-degree oven.
You're gonna wanna bake this 15 to 20 minutes, pull it out, remove the parchment paper, and then take a fork and just stick a few fork holes in there.
And I throw it in for another usually eight to 10 minutes just to get that brownness that we really like in a tomato pie.
- Sounds good.
- So let's stick this in the oven.
- [Kathy] Okay.
- Now it's time to talk tomato.
So tomato time it is.
- Love tomato time.
- You want to cut these in like a 1/4-inch thickness.
I've taken a colander here and I've put this over a large bowl and I'm just gonna take all the tomatoes in one single layer.
- Now- - And if you would salt these for me really quickly.
Just the tiniest bit of salt is gonna draw out so much water.
- We're gonna put a drizzle of balsamic.
- I love that.
- Some aged balsamic.
Just a touch.
And a touch of chopped basil.
- In the pie, in the pie.
- On this too.
- Oh, you put it on that too?
- Just a little bit.
There we go.
- You put a little chopped basil on your tomatoes already?
- Just a little.
A little more flavor.
- Just that extra flavor.
- It just does.
- I like that Kathy G has a little bit of flavor around every corner.
You want to leave these in your colander for half hour to an hour.
Really just as long as you can let these sit, just let all of that liquid drain off.
Now's the time to make the most important part of the tomato pie, and that's the filling.
- Absolutely - The yummiest part.
- Delicious.
Here's the mayo.
- Let's start with throwing a little bit of mayo in there.
And this is one cup of mayonnaise.
Come on, cheese us up, Kathy, cheese us up.
- Oh, we're gonna cheese it up.
- [Trace] So this is just regular old cheddar.
- [Kathy] This is regular, sharp cheddar or?
- Sharp cheddar.
The sharpest you can get.
- Sharp cheddar.
Okay, we're gonna put a half a cup of feta.
- [Trace] I love the feta addition too.
- I think of tomatoes as being Italian too.
- Oh, yeah, Italian.
- [Kathy] Now, we're definitely gonna put Parmesan.
- It's about a half a cup of onions and it's a few cloves of garlic.
I've went ahead and sauteed those.
- And sauteed.
They need to cool down too.
- They need to cool.
- [Kathy] Before we put it in the mayo.
- Good tip.
Yeah, if not, it would just melt our filling right on up.
So I have some fresh thyme here, just a tablespoon or so.
- [Kathy] Absolutely.
- [Trace] I have a couple tablespoons of chopped oregano there.
- And?
- And those are just some fresh chopped chives.
Give that a good stir.
And if you would sprinkle us just a little bit of salt and pepper in there.
All right, we've got that perfectly combined.
- It looks beautiful.
- Let's throw it in some crust.
We got our pie crust out of the oven popping hot.
The filling looks perfect.
Let's make the ultimate tomato pie.
I'm gonna take an ample spoonful right here and I'm gonna throw that right in the bottom of our pie crust.
I am gonna take our tomatoes that we have drained and I'm going to put just one thin layer here.
And then I'm gonna go in again and put another layer of our filling.
Smooth those out in a good even layer.
I have just a little bit more filling.
I like to fill mine right directly up to the top.
So a little bit of cheddar directly on top.
I'm gonna throw this in a 375-degree oven.
I cook mine for about 30 to 35 minutes, just until the cheese is melted.
Here we go.
Moment of truth.
It's always like the first pancake.
How's that first piece of pie gonna do?
- Oh, look at- - And look at that, woo.
- [Kathy] Oh, my gosh, we just lost one little part.
- Cheers.
- Bon appetit.
- Bon appetit.
Or as they say in Alabama, that's some good eating, y'all.
- [Kathy] There you go.
- So whenever I'm setting up a party table, any kind of party table, I want it to be functional.
And for the most part, the 4th of July is not like a formal sit-down kind of occasion.
So I like to set up a buffet.
Also feel free to kinda get a little creative.
Throw some herbs in there that you may already have on hand from the dishes that you had cooked.
Throw the greenery in.
But my biggest tip when I'm ever doing a table is more is always better.
(graphics popping) Now let's make my luncheon corn salad.
This iconic dish is always on my table in the summer whenever I'm entertaining.
And, of course, the star of our corn salad is the corn itself.
First things first, let's remove the husk and also the little silks.
Be sure to remove as much of the silks as you can before you pop this into our pot.
So once you have your corn shucked and all of the little silks removed, we are going to plop this into a pot of water.
Just cover the corn slightly.
You want to bring this to a boil and let it boil away for three to four minutes.
I immediately take my corn and plunge it into a cold ice bath.
The reason for the ice bath is it's going to preserve that really pretty vibrant color that we want in our corn.
So a tip when you are cutting corn off the cob.
And this goes if you're making corn salad or fried corn, take a bread knife that has really fine serrates on it.
Remove the end of your corn, just saw it off, and throw that into our scrap bowl.
And start at the top, of course, watch your fingers, but simply just take your serrated knife and work your way down through the corn.
Now, one of my favorite things as I make my corn salad is I really love when the corn comes off, in these almost like clumps.
Keep them like that if you can in your corn salad because that just makes for the perfect corn bite, and also it's really pretty.
So now that we've removed all of our corn kernels from the cob, I'm gonna take three tablespoons of olive oil, three tablespoons of white wine vinegar, just about a half a teaspoon of pure black pepper, half a teaspoon of salt, and I'm gonna give that a good whisk.
That is gonna be the ingredients that bind everything together.
And you're probably thinking, how in the world does those small amounts of oil and vinegar translate?
But believe me, it does.
Add your kernels directly into a large mixing bowl.
I'm gonna start just throwing in all of our ingredients, some bell pepper, a couple of stalks of celery.
The one thing that you need to pay attention to in this recipe is just make sure all of your vegetables are cut in unison.
Just kind of keep them all in the same shape.
That way the bites are equal.
Just a little bit of red onion there.
I love the color of the red onion and that little bit of bite.
And then just some Tommy Toe tomatoes, cherry tomatoes, that have been halved fresh out of the garden.
And I'm gonna add in half a cup of cucumber.
And I have peeled this cucumber and removed the seeds also.
I'm one of those people, there's two types of people in the South that eat cucumbers.
Either you leave the seeds in them or you take the seeds out.
I take them out because my mawmaw would haunt me if I left the seeds in there.
And so I'm gonna go in directly with my hands and I am going to just lightly toss this all together.
I'm using my hands ever so gently to toss this because I really want those kernels to stay together.
And now this is my favorite part.
I am a complete sucker for basil and my garden is bursting with it at the moment.
So I have taken a huge clump of basil here.
I don't really think you can have too much.
And I've layered the leaves one on top of each other and then I've simply just rolled them up into a little pouch.
So take your basil and take a sharp knife and simply just cut that basil into ribbons.
You don't want to add this basil until just right before serving because we don't want that basil to discolor and turn dark.
Simply take that basil and just layer it on top.
I'm gonna give it one more little toss just to incorporate that basil flavor into our dish there.
Gosh, it smells so good already.
Even when you're just chopping and lining this dish up, it's just remarkable how well it smells.
And I can't wait to have a bite, so I'm just gonna have one now.
Don't tell anybody.
And there you have it, luncheon corn salad ready to go on your July 4th table.
It's the perfect accompaniment to any grilled meats, veggies, tomato pies, whatever your summer table has laden on it.
This salad's for you.
So I think that, you know, when we think of 4th of July, we always think of corn.
The luncheon corn salad has always been a staple at our family gatherings.
And I've kind of like, you know when you inherit a dish that you have to make?
So the corn salad's definitely mine.
But I think the most iconic dish that our family made on 4th of July was watermelon cobbler.
(graphics popping) The South is synonymous with cobbler.
We're gonna make a variation today that I bet you haven't heard of: watermelon.
The first thing you need to do is choose a perfectly ripe out of the field watermelon.
You want to choose a watermelon that has like a buttery yellow underside.
You want it to be dull and matte in finish rather than bright and shiny green.
The good old-fashioned thump test.
Hear that thump?
(door knocking) When you hear that noise, you know that your watermelon is perfectly ripe and ready to go in a cobbler.
And how the watermelon cobbler came about is we are a watermelon growing family.
If you have a good season, you work the field really good, you have tons of watermelon.
And so I remember us trying to decide what to do with all of it and we decided on a cobbler.
The best way to cut a watermelon is to use a serrated knife and to cut off each end.
So cut off the end of the watermelon just like that.
Flip the watermelon around and also cut this end off as well.
Take your serrated knife and cut that watermelon directly in half.
So once we have our watermelon in half, we need three cups of seeded watermelon.
You want pieces of watermelon that have a little bit of meat to them, but you don't want them in huge circles because what we want is we want that watermelon to cook down and have a nice syrup to it.
I've melted eight tablespoons of butter in the oven.
To that, I'm going to directly add our watermelon slivers.
So after we've gotten three cups of watermelon, I'm gonna pour that wonderful juice directly over our watermelon here.
What that's gonna do is it's gonna give us that really good vibrant watermelon flavor and it's gonna give us that good juice that we want under our cobbler.
To that, I'm gonna do the squeeze of half of a lemon.
And the topping is a variation of a cup, a cup, a cup that your grandmother made.
So a cup of flour, just regular all-purpose flour here, A cup of sugar.
Two tablespoons of baking powder.
To that, we're gonna add a teaspoon of cinnamon, a teaspoon of vanilla extract, and a cup of buttermilk.
I love to use buttermilk versus whole milk because I really love the buttermilk flavor.
Now let's add our topping to our watermelon.
Now, this is the age old question.
Do you add the fruit first or the topping or the topping and then the fruit?
I'm gonna do what my mawmaw did and I'm gonna add my topping directly over our watermelon.
So scoop your topping over your watermelon, and we are going to get every last drop of this out of our bowl.
After you've gotten every last bit of that topping out, go ahead and give your cobbler a good shake.
Shake, shake, shake that cobbler.
To top our cobbler off, I'm gonna sprinkle that just with a little bit of cinnamon and then I'm gonna add just a pinch of sugar.
I'm gonna top it with that.
What that's gonna do, that's gonna brown off really nicely and it's gonna give our topping a really good texture.
Transfer the cobbler to a 400-degree oven and you wanna bake that for around 30 to 35 minutes just until the top is golden brown.
(bell dings) The long 35 minutes of waiting for our cobbler has now passed and it's time to eat it.
So I love to just scoop out a beautiful big piece of that cobbler, and look how gorgeous the watermelon turns out.
And then the bright color of the watermelon is just gorgeous for a summer party.
A sprig of fresh mint, and I'm ready to go.
Let's eat it.
Hot watermelon cobbler fresh out of the oven, just like your mawmaw would've made, only better.
Don't tell her I said that.
So whenever I'm planning a menu or setting a table full of dishes for a party, and also if I'm having people bring things, the best thing to do is go ahead and create a menu beforehand.
Think about like, "Oh, well, I'm having a tomato pie.
What would be a perfectly cool, refreshing side dish to that is definitely a corn salad."
So especially when it's summer and it's really hot and you're eating outside, make sure you balance your dishes so that you have dishes that are on the heavier side and maybe sides that complement it on the lighter side, whether it's a cooler dish, a little bit of a lighter dish.
Just make sure they mesh well together.
Really love the lemon possets because they're really cool and refreshing and so they're not a very heavy dessert on a hot day.
(graphics popping) So to begin our lemon possets, possets, or however you wanna say it, let's start off with 16 ounces of heavy cream, which is roughly about two cups.
Pour that directly into a sauce pan, and I'm going to turn our heat on to medium-high.
What we don't want to do is scald that cream.
To our cream, let's pour in a 3/4 a cup of granulated sugar.
Now, straight-up granulated sugar.
You do not want to use sugar in the raw here.
You do not want to use any brown sugar.
So I'm gonna give this a ample stir just to kind of stir away any of that sugar.
We want the sugar to dissolve into the cream 'cause it's gonna help thicken it up when we pour it into our containers.
So I'm gonna let that hang out.
Meanwhile, I'm going to take our lemons and I'm just going to halve those right down the middle.
So using a slotted spoon, I'm using an old grapefruit spoon today, I'm just gonna take our spoon and loosen up the flesh of the lemon just like that into a sieve that I have over a bowl.
Now that I've got that loosened up, I'm just gonna simply take my hands and kind of pull that away from the flesh and it comes out rather nicely.
So there's really not much cleaning up to do after that.
You wanna be sure and just leave a really nice thick lemon rind here so it becomes a really good vessel for our filling.
I'm gonna follow this process with the rest of our lemons.
You need half a cup of lemon juice, which is roughly about four lemons.
So while we're working on our lemons here, our heavy cream and sugar here has just came to a boil.
What I'm gonna do is I'm gonna reduce that to a simmer, just a simmer where it's just ever bubbling ever so slightly.
You're gonna want to cook this three to four minutes and just until it starts to thicken.
So now that I've got all of my lemons nice and cleaned out, I'm just going to take my hands here, which were washed yesterday, so they're pretty clean, and I'm just going to smoosh all of the juice that I can out of the lemon's flesh and into this bowl here.
Use a fine-meshed sieve and just get all of that juice we can out of the pulp.
We don't want any of that residual pulp or any of the seeds in our juice here because that's just gonna cause problems for us later.
So while that's draining, I'm going to take a zester and I'm going to just zest one whole lemon.
Now, I really love the zest part into this because that's what's gonna give us that really strong lemon flavor that we want to transfer over into our possets.
When you're zesting your lemons, just be sure and zest only the outside pretty portion of the rind.
You don't want to get any of that white pith because the white pith is bitter and we do not want that in our desserts.
So that's ample amount of zest there.
I am going to put our zest and our lemon juice right into this pot.
I'm gonna remove it from the heat.
Look at all that liquid gold going in.
And give that a good stir.
So once you remove your filling for our possets, possets, I've said it different ways throughout this video, so figure out which way you like best and just call it that, I am gonna pour that through another fine sieve.
I just wanna remove any of the lemon pulp.
And I also want to remove that little bit of zest.
I've let the zest just kind of hang out in this hot filling for a hot minute (noisemaker chimes) just so we can get that really concentrated flavor there.
You don't want to leave the zest into your dessert too, because when you have a smooth, creamy dessert, you don't wanna be biting down on that zest.
Set this to the side, and now comes the fun part.
I love to fill the containers with our filling here.
And when I say containers, I mean our little bitty lemon boats.
So I'm gonna take our bowl, and I use a bowl that has a spout, and what I'm gonna do is I'm going to pour our filling just into our lemons there.
Pour it all the way to the top, and we will transfer this to the refrigerator.
And one of my favorite things to keep your lemons from falling over when they're in the fridge is I simply like to use an egg carton.
I cut the egg carton apart with a pair of scissors and it's the perfect little ledge for them to rest on while they chill in the fridge.
Let's get all these lemons filled up.
(xylophone chiming) And so now that we have all of our containers filled, let's put those in the fridge for a minimum of four hours.
Now that we are sufficiently set and chilled here on our beautiful desserts, now's the time to garnish up our lemon possets here before we serve them.
I've taken a paring knife and I've just made ever the smallest little slivers of citrus there.
I'm gonna put those right on our desserts.
I'm also gonna top that with just a little bit of a mint leaf because mint is such a good thing to have in the garden for garnishes.
And I'm also gonna add some edible flowers.
So if you have any pansies or violas hanging out in your garden, now's the perfect time to adorn some desserts with those too.
Now, optionally, if you really wanna get in depth, you can take a kitchen torch and brulee the top of these, but I always skip that step because I simply just can't wait any longer.
Plus, look how pretty they look anyway.
(bright music) (bright music continues) Kathy G, happy 4th of July.
We did it.
- Trace Barnett, what fun this has been to do it together.
- Party ready.
- Oh, we are.
We have fabulous food.
And look at how it's set up.
I love risers.
I think you have to have some elevations, not just put food flat on the table, and you can use anything to elevate your risers.
- And you know what I love, Kathy?
- What do you love?
- I love some versatile things like baskets, galvanized buckets.
I love to pack all of my outdoor stuff into them.
Old suitcases.
Haul them right on outside, layer them up on the table, and your guests are gonna be amazed.
- Great idea.
And greenery.
Don't forget to soften the table, whether it's some greenery out of your yard.
Some herbs are wonderful, and they have a fabulous scent.
Oh, they smell fabulous the whole evening.
- And guess what it's already doing to me?
It's making me hungry.
- Oh, the piece de resistance.
- The piece de resistance, dessert time.
- Oh, yes.
- Cheers.
- Cheers.
Oh, beautiful.
Mm.
- Oh my God.
- Oh, this is divine.
- It tastes just like summer in a bite.
And it's also so refreshing.
- It's so, look at this presentation.
- There's just fireworks booming all in our mouth.
- It's gorgeous, yeah.
- Happy 4th of July, y'all.
- Happy 4th of July.
(upbeat music) - Find us on Alabama Public Television's YouTube, where you can watch us anytime.
Here, Kathy.
- Mm.
(Trace laughs) (Kathy chuckles) (Trace groans) - Should we get me trying to juggle them?
- [Director] Yes.
(upbeat music continues) - I was doing so good until the camera was on.
Today we're making luncheon corn salad.
(Trace laughs) We're authentic here.
- We are.
- We probably wouldn't pass health code, but.
(upbeat music continues)
Preview Garden Party with Trace Barnett: Summer Celebration
Preview: Special | 30s | Garden Party with Trace Barnett presents swanky, Southern recipes that'll light up your summer! (30s)
Providing Support for PBS.org
Learn Moreabout PBS online sponsorship

- Food
Christopher Kimball’s Milk Street Television
Transform home cooking with the editors of Christopher Kimball’s Milk Street Magazine.


Support for PBS provided by:
Garden Party is a local public television program presented by APT